Focus on Java


  • 首页

  • 标签

  • 分类

  • 归档

从TreeMap学习红黑树

发表于 2018-02-22 |

红黑树是一种自平衡二叉查找树,常用于键值对存储,例如Java的TreeMap中就采用红黑树实现。它可以在O(logN)时间内查找、插入和删除

红黑树定义与性质

红黑树定义

  1. 点是红色或者黑色

  2. 根节点是黑色

  3. 所有叶子节点是黑色(null节点)

  4. 每个红色节点都必须要有两个黑色子节点

  5. 从任一节点到叶子节点都包含同样数目的黑色节点

红黑树性质

根据红黑树的定义,从根到叶子的最长路径不多于最短的两倍。由于性质4每个红色节点均有两个黑色节点,性质5限制了黑色节点的数目,这样可以限制最短的路径为全是黑色节点的,而最长的路径为红黑节点交替的路径

TreeMap中红黑树

红黑树仍是一个二叉排序树,如果是二叉排序树那么

  • 若左子树不空,则左子树上的值均小于它的根节点

  • 若右子树不空,则右子树上的值均大于它的根节点

  • 它的左右字数也分别为排序二叉树

那么,对一棵二叉排序树进行中序遍历就可以得到排序后的结果

二叉排序树.png

中序排序后为 1,2,3,4,5,7

树的旋转

红黑树的旋转可以保持节点符合排序的规则,但是不一定能使其满足红黑树的红黑颜色规则,需要对其进行修复。其操作分为左旋,右旋

  • 左旋

操作在旋转节点的右子树,将待旋转节点的右节点上升到父节点的位置上

左旋.png

1
2
3
4
5
6
7
8
9
10
11
12
13
14
15
16
17
private void rotateLeft(RedBlackNode<T> node) {
if (node != null) {
RedBlackNode<T> rChild = node.right;
node.right = rChild.left;
if (rChild.left != null)
rChild.left.parent = node;
rChild.parent = node.parent;
if (node.parent == null)
root = rChild;
else if (node.parent.left == node)
node.parent.left = rChild;
else
node.parent.right = rChild;
rChild.left = node;
node.parent = rChild;
}
}
  • 右旋

操作在旋转节点的左子树,将待旋转节点的左节点上升到父节点的位置上

右旋.png

1
2
3
4
5
6
7
8
9
10
11
12
13
14
15
16
17
private void rotateRight(RedBlackNode<T> node) {
if (node != null) {
RedBlackNode<T> lChild = node.left;
node.left = lChild.right;
if (lChild.right != null)
lChild.parent = node;
lChild.parent = node.parent;
if (node.parent == null)
root = lChild;
else if (node.parent.left == node)
node.parent.left = lChild;
else
node.parent.right = lChild;
lChild.right = node;
node.parent = lChild;
}
}

红黑树的插入

红黑树的插入,首先确认插入的位置

1
2
3
4
5
6
7
8
9
10
11
12
13
14
15
16
17
18
19
20
21
22
23
24
25
26
27
28
29
30
31
private T insert(final RedBlackNode<T> newNode) {
RedBlackNode<T> t = root;
if (t == null) { // 如果为空树
root = newNode;
size = 1;
return newNode.key;
}
RedBlackNode<T> parent;
int cmp;
do {
parent = t;
cmp = compare(newNode, t);
if (cmp < 0) {
t = t.left;
} else if (cmp > 0) {
t = t.right;
} else {
return t.key;
}
} while (t != null); // 查找到合适的位置

newNode.parent = parent;
if (cmp < 0) {
parent.left = newNode;
} else {
parent.right = newNode;
}
fixInsertion(newNode);
size++;
return null;
}

红黑树插入修复

插入之后需要对树进行修复,使其满足红黑树的性质

其中,

  • 如果插入的是根节点,将新加入节点涂黑,对树没有影响,直接插入

  • 如果插入的节点的父节点为黑色节点,对树没有影响

但是,当遇到

  1. 当前节点的父节点是红色并且叔叔节点是红色

插入新节点为颜色为红色,不符合红黑树定义。需要进行调整

假如叔叔节点为祖父节点的右孩子。那么插入修复需要将当前节点的父亲节点和叔叔节点的颜色改为黑色,并将祖父节点变更为红色,当前节点指向祖父节点,继续进行修复

修复前

修复后

  1. 当前节点的父节点为红色,叔叔节点为黑色,当前节点为父节点的右节点

同样不符合红黑树定义

如果当前节点的父节点为祖父节点的左孩子,则将当前节点指向当前节点的父节点,对新当前节点左旋

修复前

修复后

情况2修复完成之后,需要继续进行情况3的修复

  1. 当前节点的父节点为红色,叔叔节点为黑色,当前节点为父节点左节点

如果当前节点的父节点是祖父节点的左孩子,则将父节点变为黑色,祖父节点变为红色,并且以祖父节点为支点右旋

修复前

修复后

1
2
3
4
5
6
7
8
9
10
11
12
13
14
15
16
17
18
19
20
21
22
23
24
25
26
27
28
29
30
31
32
33
34
35
36
37
38
39
40
41
private void fixInsertion(RedBlackNode<T> node) {
node.color = RED;

while (node != null && node != root && colorOf(parentOf(node)) == RED {
if (parentOf(node) == leftOf(ancestorOf(node))) {
// 当前的父节点是祖父节点的左孩子
RedBlackNode<T> uncle = rightOf(ancestorOf(node));
if (colorOf(uncle) == RED) {
setColor(parentOf(node), BLACK);
setColor(uncle, BLACK);
setColor(ancestorOf(node), RED);
node = ancestorOf(node);
} else {
if (node == rightOf(parentOf(node))) {
node = parentOf(node);
rotateLeft(node);
}
setColor(parentOf(node), BLACK);
setColor(ancestorOf(node), RED);
rotateRight(ancestorOf(node));
}
} else {
RedBlackNode<T> uncle = leftOf(ancestorOf(node));
if (colorOf(uncle) == RED) {
setColor(parentOf(node), BLACK);
setColor(uncle, BLACK);
setColor(ancestorOf(node), RED);
node = ancestorOf(node);
} else {
if (node == leftOf(parentOf(node))) {
node = parentOf(node);
rotateRight(node);
}
setColor(parentOf(node), BLACK);
setColor(ancestorOf(node), RED);
rotateLeft(ancestorOf(node));
}
}
}
root.color = BLACK;
}

插入的修复过程是不断向走向根节点的,然后把整棵树修复

红黑树的删除

删除红黑树中的节点之后,需要对树进行维护使得红黑树仍符合红黑树的定义

  1. 如果被删除的节点是叶结点,没有孩子,直接从其父节点中删除此节点即可

  2. 如果只有一个孩子,则直接将父节点的对应的孩子指向这个孩子即可

  3. 如果有两个孩子,情况会复杂点。首先需要保证符合排序二叉树的性质。删除此结点之后,可以选择其左子树的最大结点或者右子树的最小结点替换。TreeMap中是寻找了被删除的结点的中序遍历的后继结点,也就是选择了右子树的最小结点来替换这个结点。

1
2
3
4
5
6
7
8
9
10
11
12
13
14
15
16
17
18
19
20
21
22
23
24
25
26
27
28
29
30
31
32
33
34
35
36
37
38
39
40
41
42
private void deleteNode(RedBlackNode<T> node) {
size--;
if (node.left != null && node.right != null) {
// 中序后继节点替代
RedBlackNode<T> next = successor(node);
// 注意此时替换了key值
node.key = next.key;
// 仅仅替换了引用
node = next;
}
// 对替换的结点 与 被删除的结点进行替换
RedBlackNode<T> replacement = (node.left != null ? node.left : node.right);

// 对替换的结点的孩子进行连接,并脱离被替换节点
if (replacement != null) {
replacement.parent = node.parent;
if (node.parent == null)
root = replacement;
else if (node == node.parent.left)
node.parent.left = replacement;
else node.parent.right = replacement;

node.left = node.right = node.parent = null;

if (node.color == BLACK)
fixDeletion(replacement);
} else if (node.parent == null) {
// 当前删除的节点是根节点
root = null;
} else {
if (node.color == BLACK)
fixDeletion(node);

if (node.parent != null) {
if (node == node.parent.left)
node.parent.left = null;
else if (node == node.parent.right)
node.parent.right = null;
node.parent = null;
}
}
}

红黑树删除修复

如果被删除的结点是红色,则不需要做任何修复即可

如果被是删除结点是黑色,则有可能会造成红黑树性质被破坏

  • 如果删除的黑色不是红黑树的唯一结点,那么从被删除结点的分支的黑色结点数必然会不正确,性质5被破坏
  • 如果被删除结点的唯一非空子结点是红色,且父结点也是红色,违反性质4
  • 如果被删除结点为根节点,且其替换结点为红色,违反性质2

针对以上的情况,分以下解决(讨论当前结点为父结点左孩子)

“下面我们用一个分析技巧:我们从被删结点后来顶替它的那个结点开始调整,并认为它有额外的一重黑色。这里额外一重黑色是什么意思呢,我们不是把红黑树的结点加上除红与黑的另一种颜色,这里只是一种假设,我们认为我们当前指向它,因此空有额外一种黑色,可以认为它的黑色是从它的父结点被删除后继承给它的,它现在可以容纳两种颜色,如果它原来是红色,那么现在是红+黑,如果原来是黑色,那么它现在的颜色是黑+黑。有了这重额外的黑色,原红黑树性质5就能保持不变。现在只要恢复其它性质就可以了,做法还是尽量向根移动和穷举所有可能性。”–saturnman

  1. 当前结点(被替换的结点)为黑色+黑色,且兄弟结点为红色

此时父结点为黑色,并且兄弟的孩子结点也都为黑色,那么把父结点染红,兄弟结点染黑,之后以父结点为点左旋,更新下兄弟节点。这样转化问题为兄弟节点为黑色的问题。这时替换结点上仍有一重黑色,继续进入算法

修复前

修复后

1
2
3
4
5
6
if (colorOf(sibling) == RED) {
setColor(sibling, BLACK);
setColor(parentOf(node), RED);
rotateLeft(parentOf(node));
sibling = rightOf(parentOf(node));
}
  1. 当前为黑+黑,兄弟节点为黑色,且兄弟节点的孩子也为黑色

这时候需要将当前结点和兄弟节点中剥离出来一层黑色给他们的父结点。那么当前为黑+黑,因此还是黑色,而兄弟结点只有一层黑色,因此变为红色,如果父结点为红色,则算法结束,否则继续以父结点为当前结点继续进行算法

修复前
修复后

1
2
3
4
5
if (colorOf(leftOf(sibling)) == BLACK &&
colorOf(rightOf(sibling)) == BLACK) {
setColor(sibling, RED);
node = parentOf(node);
}
  1. 当前为黑+黑,兄弟结点为黑色,且兄弟结点的左孩子为红色,右孩子为黑色

这种情况需要转化为情况4,因此将兄弟结点染红,兄弟的左子染黑,之后右旋,更新兄弟结点

修复前

修复后

1
2
3
4
5
6
if (colorOf(rightOf(sibling)) == BLACK) {
setColor(leftOf(sibling), RED);
setColor(sibling, RED);
rotateRight(sibling);
sibling = rightOf(parentOf(node));
}
  1. 当前结点为黑+黑,兄弟结点为黑色,且兄弟结点的右孩子为红色,左孩子为任意颜色

将兄弟结点染成父结点颜色,父结点染成黑色,兄弟结点右孩子染黑,以父结点为支点左旋。当前结点设为根节点,调整结束

修复前

修复后

1
2
3
4
5
setColor(sibling, colorOf(parentOf(node)));
setColor(parentOf(node), BLACK);
setColor(rightOf(sibling), BLACK);
rotateLeft(parentOf(node));
node = root;

其实这个修复删除的过程就是调整替代结点的多加的这层黑色,使其能够补偿到被删除的黑色结点,这样就可以在保持红黑树的性质。

参考

  • 红黑树深入剖析及Java实现

  • 教你透彻了解红黑树

实现

1
2
3
4
5
6
7
8
9
10
11
12
13
14
15
16
17
18
19
20
21
22
23
24
25
26
27
28
29
30
31
32
33
34
35
36
37
38
39
40
41
42
43
44
45
46
47
48
49
50
51
52
53
54
55
56
57
58
59
60
61
62
63
64
65
66
67
68
69
70
71
72
73
74
75
76
77
78
79
80
81
82
83
84
85
86
87
88
89
90
91
92
93
94
95
96
97
98
99
100
101
102
103
104
105
106
107
108
109
110
111
112
113
114
115
116
117
118
119
120
121
122
123
124
125
126
127
128
129
130
131
132
133
134
135
136
137
138
139
140
141
142
143
144
145
146
147
148
149
150
151
152
153
154
155
156
157
158
159
160
161
162
163
164
165
166
167
168
169
170
171
172
173
174
175
176
177
178
179
180
181
182
183
184
185
186
187
188
189
190
191
192
193
194
195
196
197
198
199
200
201
202
203
204
205
206
207
208
209
210
211
212
213
214
215
216
217
218
219
220
221
222
223
224
225
226
227
228
229
230
231
232
233
234
235
236
237
238
239
240
241
242
243
244
245
246
247
248
249
250
251
252
253
254
255
256
257
258
259
260
261
262
263
264
265
266
267
268
269
270
271
272
273
274
275
276
277
278
279
280
281
282
283
284
285
286
287
288
289
290
291
292
293
294
295
296
297
298
299
300
301
302
303
304
305
306
307
308
309
310
311
312
313
314
315
316
317
318
319
320
321
322
323
324
325
326
327
328
329
330
331
332
333
334
335
336
337
338
339
340
341
342
343
344
345
346
347
348
349
350
351
352
353
354
355
356
357
358
359
360
361
362
363
364
365
366
367
368
369
370
371
372
373
374
375
376
377
378
379
380
package me.learn.datastruct;

import java.util.LinkedList;
import java.util.Queue;

public class RedBlackTree<T extends Comparable<T>> {

private transient RedBlackNode<T> root;
private transient int size = 0;

public void add(T key) {
RedBlackNode<T> node = new RedBlackNode<>(key);
insert(node);
}

public void remove(T key) {
RedBlackNode<T> node = getNode(key);
if (node == null)
return;
deleteNode(node);
}

private void deleteNode(RedBlackNode<T> node) {
size--;
if (node.left != null && node.right != null) {
// 中序后继节点替代
RedBlackNode<T> next = successor(node);
node.key = next.key;
node = next;
}
RedBlackNode<T> replacement = (node.left != null ? node.left : node.right);

if (replacement != null) {
replacement.parent = node.parent;
if (node.parent == null)
root = replacement;
else if (node == node.parent.left)
node.parent.left = replacement;
else node.parent.right = replacement;

node.left = node.right = node.parent = null;

if (node.color == BLACK)
fixDeletion(replacement);
} else if (node.parent == null) {
// 当前删除的节点是根节点
root = null;
} else {
if (node.color == BLACK)
fixDeletion(node);

if (node.parent != null) {
if (node == node.parent.left)
node.parent.left = null;
else if (node == node.parent.right)
node.parent.right = null;
node.parent = null;
}
}
}

private void fixDeletion(RedBlackNode<T> node) {
while (node != root && colorOf(node) == BLACK) {
if (node == leftOf(parentOf(node))) {
RedBlackNode<T> sibling = rightOf(parentOf(node));

if (colorOf(sibling) == RED) {
setColor(sibling, BLACK);
setColor(parentOf(node), RED);
rotateLeft(parentOf(node));
sibling = rightOf(parentOf(node));
}

if (colorOf(leftOf(sibling)) == BLACK &&
colorOf(rightOf(sibling)) == BLACK) {
setColor(sibling, RED);
node = parentOf(node);
} else {
if (colorOf(rightOf(sibling)) == BLACK) {
setColor(leftOf(sibling), RED);
setColor(sibling, RED);
rotateRight(sibling);
sibling = rightOf(parentOf(node));
}
setColor(sibling, colorOf(parentOf(node)));
setColor(parentOf(node), BLACK);
setColor(rightOf(sibling), BLACK);
rotateLeft(parentOf(node));
node = root;
}
} else {
RedBlackNode<T> sibling = leftOf(parentOf(node));

if (colorOf(sibling) == RED) {
setColor(sibling, BLACK);
setColor(parentOf(node), RED);
rotateRight(parentOf(node));
sibling = leftOf(parentOf(node));
}

if (colorOf(rightOf(sibling)) == BLACK &&
colorOf(leftOf(sibling)) == BLACK) {
setColor(sibling, RED);
node = parentOf(node);
} else {
if (colorOf(leftOf(sibling)) == BLACK) {
setColor(rightOf(sibling), RED);
setColor(sibling, RED);
rotateLeft(sibling);
sibling = leftOf(parentOf(node));
}
setColor(sibling, colorOf(parentOf(node)));
setColor(parentOf(node), BLACK);
setColor(leftOf(sibling), BLACK);
rotateRight(parentOf(node));
node = root;
}
}
}

setColor(node, BLACK);
}

/**
* node 中序的后继节点
* @param node
* @return
*/
private RedBlackNode<T> successor(RedBlackNode<T> node) {
if (node == null)
return null;
if (node.right != null) {
RedBlackNode<T> t = node.right;
while (t.left != null)
t = t.left;
return t;
} else {
RedBlackNode<T> p = node.parent;
RedBlackNode<T> child = node;
while (p != null && child == p.right) {
child = p;
p = p.parent;
}
return p;
}
}

private RedBlackNode<T> getNode(T key) {
if (key == null)
throw new NullPointerException();
RedBlackNode<T> node = root;
while (node != null) {
int cmp = key.compareTo(node.key);
if (cmp < 0)
node = node.left;
else if (cmp > 0)
node = node.right;
else
return node;
}
return null;
}

private T insert(final RedBlackNode<T> newNode) {
RedBlackNode<T> t = root;
if (t == null) {
root = newNode;
size = 1;
return newNode.key;
}
RedBlackNode<T> parent;
int cmp;
do {
parent = t;
cmp = compare(newNode, t);
if (cmp < 0) {
t = t.left;
} else if (cmp > 0) {
t = t.right;
} else {
return t.key;
}
} while (t != null);

newNode.parent = parent;
if (cmp < 0) {
parent.left = newNode;
} else {
parent.right = newNode;
}
fixInsertion(newNode);
size++;
return null;
}

private void fixInsertion(RedBlackNode<T> node) {
node.color = RED;

while (node != null && node != root && colorOf(parentOf(node)) == RED) {
if (parentOf(node) == leftOf(ancestorOf(node))) {
// 当前的父节点是祖父节点的左孩子
RedBlackNode<T> uncle = rightOf(ancestorOf(node));
if (colorOf(uncle) == RED) {
setColor(parentOf(node), BLACK);
setColor(uncle, BLACK);
setColor(ancestorOf(node), RED);
node = ancestorOf(node);
} else {
if (node == rightOf(parentOf(node))) {
node = parentOf(node);
rotateLeft(node);
}
setColor(parentOf(node), BLACK);
setColor(ancestorOf(node), RED);
rotateRight(ancestorOf(node));
}
} else {
RedBlackNode<T> uncle = leftOf(ancestorOf(node));
if (colorOf(uncle) == RED) {
setColor(parentOf(node), BLACK);
setColor(uncle, BLACK);
setColor(ancestorOf(node), RED);
node = ancestorOf(node);
} else {
if (node == leftOf(parentOf(node))) {
node = parentOf(node);
rotateRight(node);
}
setColor(parentOf(node), BLACK);
setColor(ancestorOf(node), RED);
rotateLeft(ancestorOf(node));
}
}
}
root.color = BLACK;
}

private void rotateLeft(RedBlackNode<T> node) {
if (node != null) {
RedBlackNode<T> rChild = node.right;
node.right = rChild.left;
if (rChild.left != null)
rChild.left.parent = node;
rChild.parent = node.parent;
if (node.parent == null)
root = rChild;
else if (node.parent.left == node)
node.parent.left = rChild;
else
node.parent.right = rChild;
rChild.left = node;
node.parent = rChild;
}
}

private void rotateRight(RedBlackNode<T> node) {
if (node != null) {
RedBlackNode<T> lChild = node.left;
node.left = lChild.right;
if (lChild.right != null)
lChild.parent = node;
lChild.parent = node.parent;
if (node.parent == null)
root = lChild;
else if (node.parent.left == node)
node.parent.left = lChild;
else
node.parent.right = lChild;
lChild.right = node;
node.parent = lChild;
}
}

private void setColor(RedBlackNode<T> node, boolean color) {
if (node != null) node.color = color;
}

private boolean colorOf(RedBlackNode<T> node) {
return node == null ? BLACK : node.color;
}

private RedBlackNode<T> ancestorOf(RedBlackNode<T> node) {
return parentOf(parentOf(node));
}

private RedBlackNode<T> parentOf(RedBlackNode<T> node) {
return node.parent;
}

private RedBlackNode<T> leftOf(RedBlackNode<T> node) {
return node.left;
}

private RedBlackNode<T> rightOf(RedBlackNode<T> node) {
return node.right;
}

private int compare(RedBlackNode<T> t1, RedBlackNode<T> t2) {
return t1.key.compareTo(t2.key);
}

private static final boolean BLACK = true;
private static final boolean RED = false;

static final class RedBlackNode<T extends Comparable<T>> {
T key;
RedBlackNode<T> left;
RedBlackNode<T> right;
RedBlackNode<T> parent;
boolean color = BLACK;

public RedBlackNode() {
}

public RedBlackNode(T key) {
this.key = key;
}

public RedBlackNode(T key, RedBlackNode<T> parent) {
this.key = key;
this.parent = parent;
}

@Override
public String toString() {
String result = "";
return color == RED && parent != null ?
String.format("[Red][parent[%s]][key[%s]]", parent.key, key)
: color == BLACK && parent != null ?
String.format("[BLK][parent[%s]][key[%s]]", parent.key, key)
: String.format("ROOT[key[%s]]", key);
}
}

private void printTree() {
RedBlackNode<T> rootData = root;
Queue<RedBlackNode<T>> queue = new LinkedList<>();
Queue<RedBlackNode<T>> queue1 = new LinkedList<>();
queue.offer(rootData);
boolean isDefaultQueue = true;

while (!queue.isEmpty() || !queue1.isEmpty()) {
Queue<RedBlackNode<T>> mQueue = isDefaultQueue ? queue : queue1;
RedBlackNode<T> node = mQueue.poll();
if (node != null) {
String nodeInfo = "";
if (node.parent != null) {
if (node == node.parent.left)
nodeInfo = "[LE]";
else
nodeInfo = "[RH]";
}
if (node.left != null) {
(isDefaultQueue ? queue1 : queue).offer(node.left);
}
if (node.right != null) {
(isDefaultQueue ? queue1 : queue).offer(node.right);
}
System.out.print(nodeInfo + node + "\t");
} else {
System.out.println();
isDefaultQueue = !isDefaultQueue;
}
}
}

public static void main(String[] argv) {
RedBlackTree<Integer> tree = new RedBlackTree<>();
tree.add(1);
tree.add(2);
tree.add(3);
tree.add(4);
tree.add(5);
tree.add(10);
tree.printTree();
System.out.println("\n===============================");
tree.remove(4);
tree.printTree();
}
}

Java注解处理器

发表于 2017-06-16 |

注解在Android开发中用得越来越广泛,很多知名的Android库都用注解来实现了,很酷,很方便。在这篇文章将会介绍JAVA注解,并讲解如何编写一个简单的注解处理器。另外,需要注意的是,本篇文章仅仅涉及到编译时注解,不涉及运行时(runtime)注解

一些知识

JAVA注解处理器总的来说是一个javac内置的编译时扫描以及处理注解的工具。在编译阶段,通过注解处理器就可以获取到注解的内容,进而进行一些操作。例如ButterKnife,它通过注解来对View进行绑定,节省了编写绑定事件的代码的时间,其原理就是在编译阶段生成XXX_ViewBinding.java,在新生成的类中进行绑定

开始

接下来,就模仿ButterKnife来实现一个简单的注解处理器

Annotation

以Android项目为例,需要新建module用以定义annotation。

1
2
3
4
5
@Retention(RetentionPolicy.CLASS) //确定为编译时的注解
@Target(ElementType.FIELD) //注解的目标类型
public @interface AAA {
int value();// 对应R.id.xxxx
}

Processor

Processor部分是对注解处理器的实现部分

AbstractProcessor

1
2
3
4
5
6
7
8
9
10
11
12
13
14
15
16
17
18
public class AAACompiler extends AbstractProcessor {

@Override public Set<String> getSupportedAnnotationTypes() {
return Collections.singleton(AAA.class.getCanonicalName());
}

@Override public SourceVersion getSupportedSourceVersion() {
return SourceVersion.latestSupported();
}

@Override public synchronized void init(ProcessingEnvironment processingEnvironment) {
super.init(processingEnvironment);
}

@Override public boolean process(Set<? extends TypeElement> set, RoundEnvironment env) {
return false;
}
}

AbstractProcessor是处理器的API

init方法内主要是使用processEnv参数,通过processEnv来获取Elements,Types以及Filer

process方法为处理注解的main方法,在这个方法里面你可以查找,处理注解,以及生成java文件,并将其编译到class中

getSupportedAnnotationTypes方法是说明需要处理那些注解

process

我们的目标是生成XXXActivity$$ViewBind.java文件,通过这个类来对View实例化,从而达到不写findViewById的目的。
例如,下面的Activity

1
2
3
4
5
6
7
8
9
10
11
12
13
14
15
16
17
public class MainActivity extends AppCompatActivity {

@AAA(R.id.tv)
TextView mTV;
@AAA(R.id.tv_1)
TextView mTV_1;
@Override
protected void onCreate(Bundle savedInstanceState) {
super.onCreate(savedInstanceState);
setContentView(R.layout.activity_main);

MainActivity$$AAA_ViewBind.bindView(this);

mTV.setText("AAA");
mTV_1.setText("AAA_1");
}
}

期望自动生成的文件为

1
2
3
4
5
6
public final class MainActivity$$AAA_ViewBind extends MainActivity {
public static void bindView(MainActivity activity) {
activity.mTV = (android.widget.TextView) activity.findViewById(2131427422);
activity.mTV_1 = (android.widget.TextView) activity.findViewById(2131427423);
}
}

因此,后续的操作是:

  • 找到@AAA注解的所有变量,并确定其所在类,记录下来
  • 根据记录,生成XXXActivity$$ViewBind类
1
2
3
4
5
6
7
8
9
10
11
12
13
14
15
16
17
18
19
20
21
22
23
24
25
26
27
28
29
30
31
32
33
34
35
36
37
38
39
40
41
42
43
44
45
46
47
@Override public boolean process(Set<? extends TypeElement> set, RoundEnvironment env) {
Map<TypeElement, List<? extends Element>> pending;
Set<? extends Element> elements = env.getElementsAnnotatedWith(AAA.class);
for (Element e: elements) {
TypeElement type = (TypeElement) e.getEnclosingElement();
ArrayList<? extends Element> list = new ArrayList<>(elementsUtils.getAllMembers(type));
Iterator<? extends Element> it = list.listIterator();
while (it.hasNext()) {
Element item = it.next();
if (item == null
|| item.getAnnotation(AAA.class) == null) {
it.remove();//查找所有AAA注解的变量
}
}
if (list.size() > 0) {
pending.put(type, list);
}
}

for (TypeElement element:pending.keySet()) {
//生成文件
MethodSpec.Builder bindViewMethodSpecBuilder = MethodSpec.methodBuilder("bindView")
.addModifiers(Modifier.PUBLIC, Modifier.STATIC)
.returns(TypeName.VOID)
.addParameter(ClassName.get(element.asType()), "activity");
for (Element e: pending.get(element)) {
bindViewMethodSpecBuilder.addStatement(String.format("activity.%s = (%s) activity.findViewById(%s)",
e.getSimpleName(), ClassName.get(e.asType()).toString(), e.getAnnotation(AAA.class).value()));
}
TypeSpec typeSpec = TypeSpec.classBuilder(element.getSimpleName() + "$$AAA_ViewBind")
.superclass(TypeName.get(element.asType()))
.addModifiers(Modifier.PUBLIC,Modifier.FINAL)
.addMethod(bindViewMethodSpecBuilder.build())
.build();
JavaFile javaFile = JavaFile.builder(getPackageName(element), typeSpec).build();

try {
javaFile.writeTo(processingEnv.getFiler());
} catch (IOException e) {
//e.printStackTrace();

}
}


return true;
}

在生成文件的时候,可能会提示recreate file的错误,这是因为process函数会被调用多次,因此因此第一轮已经生成了java文件,而处理器不允许重新生成已经生成的文件,因此第二轮就会报错,可以用boolean进行标记来解决

至此一个简单的注解处理器已经完成了

一次诡异的内存泄漏

发表于 2017-03-24 |

本来很开心调试着毕设写的应用,关闭应用之后,LeakCanary提示出现MainActivity内存泄漏,心里一惊,MainActivity并没有引用很多内容啊,然后就赶紧把把堆快照出来看。

LeakCanary提示

1
2
3
4
5
6
In com.shiyan.netdisk_android:1.0:1.
* com.shiyan.netdisk_android.main.MainActivity has leaked:
* GC ROOT static android.view.inputmethod.InputMethodManager.sInstance
* references android.view.inputmethod.InputMethodManager.mNextServedView
* references android.support.v7.widget.RecyclerView.mContext
* leaks com.shiyan.netdisk_android.main.MainActivity instance

一时有点不知所措,打开堆之后,找到自己的包文件,发现果然MainActivity的RetainedSize占了整个包的一大部分

1.png

再次展开它的引用,找到了三个引用

2.PNG

果然如LeakCanary提示,来自InputManager.sInstance

感觉这个是来自Android SDK的错误啊。。。

再次检查自己的代码,有点蒙蔽毫无头绪 -_-

加密算法学习笔记

发表于 2017-03-12 |

记录下写加密文件脚本时候查阅的相关加密算法总结

本文涉及的加密算法

对称加密算法

DES
AES

密码模式

密码本模式
密码块链模式
密码反馈模式

对称加密算法

使用相同的密钥来加密和解密的算法成为对称加密算法

1.DES

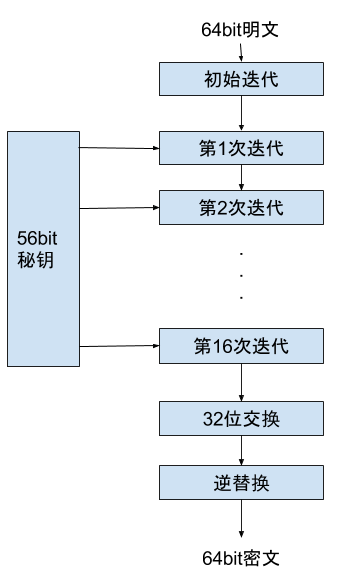
DES计算方法如下图。
DES

DES(b)

每次计算都是讲64bit明文拆分为左半部和右半部。下一轮的迭代输入左侧为上一轮的右半部,下一轮的右半部通过计算 $$ L_{i-1}\oplus f(R_{i-1}, K_i) $$ 其中 $$K_i$$ 表示当前所使用的密钥,而 $$f(R_{i-1}, K_i)$$ 的函数表示的是以下步骤

  • 根据一个固定的替代和复制规则,将32位的 $$R_{i-1}$$扩展成一个一个48位的数字$$E$$
  • $$E$$和$$K_i$$被异或在一起
  • 异或的结果被分成8个6位组,每个6位组被输入到不同S盒(置换)中。对于每个S盒共有$$2^6$$种可能输入,每种输入被映射到4位输出上。最后将这$$8\times4$$位通过一个P盒(排列)

    DES 附加材料wiki
    例如映射出的4位的S盒的S5表格。S盒wiki
    例如输入 0 1101 1那么寻找行01列1101的部分即为1001

S5 Middle 4 bits of input
0000 0001 0010 0011 0100 0101 0110 0111 1000 1001 1010 1011 1100 1101 1110 1111
Outer bits 00 0010 1100 0100 0001 0111 1010 1011 0110 1000 0101 0011 1111 1101 0000 1110 1001
01 1110 1011 0010 1100 0100 0111 1101 0001 0101 0000 1111 1010 0011 1001 1000 0110
10 0100 0010 0001 1011 1010 1101 0111 1000 1111 1001 1100 0101 0110 0011 0000 1110
11 1011 1000 1100 0111 0001 1110 0010 1101 0110 1111 0000 1001 1010 0100 0101 0011

其中16次迭代中使用了不同的密钥。算法开始前会对56位的密钥执行56位替换操作,每次迭代开始前也会将密钥分成两个28位,每部分向左循环移位,移位位数取决于当前迭代次数,移位之后,执行56位替代。

其中S盒和P盒操作代表的是密码置换和替换。

2.AES

随着DES安全性下降,慢慢被淘汰。

SSL 1.2版本以及TLS中已经使用了更加安全的AES算法来加密。

AES

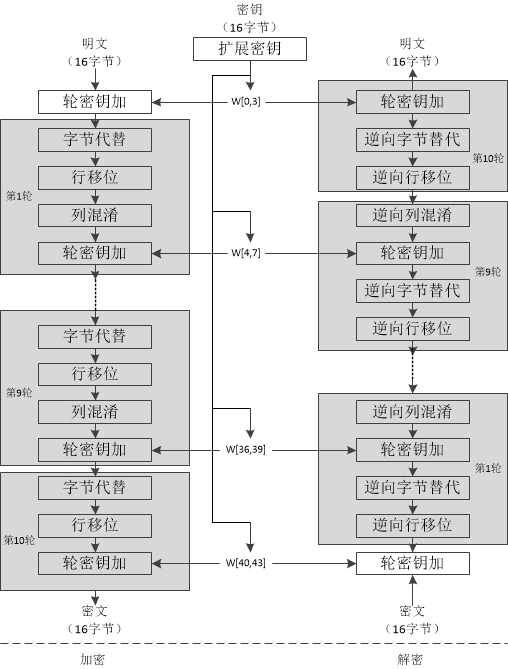
AES加密相对DES更加复杂,其过程是在一个4X4的字节矩阵中完成的,这个矩阵称为state。
算法的过程,参考《计算机网络》第八章的代码结构

1
2
3
4
5
6
7
8
9
10
11
12
13
14
15
16
17
18
19
20
21
22
23
24
25
26
27
28
29
30
#define LENGTH 16
#define NROWS 4
#define NCOLS 4
#define ROUNDS 10
typedef unsigned char byte;
rijndeal(byte plaintext[LENGTH], byte ciphertext[LENGTH], byte key[LENGTH]) {
int r; /*记录当前处理到第几轮*/
byte state[NROWS][NCOLS]; /*主要操作的矩阵*/
struct {
byte k[NROWS][NCOLS];
} rk[ROUNDS+1];
expand_keys(key, rk);
/*算法开始前会进行扩展key,扩展结果放在11个rk数组中。其中一个会被用在计算最开始处,其余被用在10轮计算中*/
xor_roundkey_into_state(state, rk[0]);
/*算法开始前,rk[0]和state先执行一个异或操作,然后存入state中*/
for(r=1; r<= ROUNDS; r++) {
substitute(state);
/*替代过程,这其中会有个一S盒,每个字节都会有对应得一个字节输出。
不同于DES存在多个S盒,这个过程仅有一个S盒*/
rotate_rows(state);
/*左循环移动,0行不移动,1行移动一位,2行移动两位,3行移动三位*/
if (r<ROUNDS) {
mix_columns(state);
/*混淆操作,这过程中包含了一个在有限域GF(Galois field)(2^8)上的乘法*/
xor_roundkey_into_state(state, rk[r]);
/*异或密钥,供下一轮加密使用*/
}
}
copy_state_to_ciphertext(state, ciphertext)
}

Rijndael的加密结构即以上的部分。上面的加密过程是对于128位密钥的情况。输入的明文是16字节的,密钥也是16字节的。Rijndael的加密支持128,192,256位的密钥。

密码模式

注:以下公式中$$P$$代表明文(plaintext) $$E$$代表加密,$$D$$代表解密,$$C$$代表密文(cipher)

1.密码本模式

比如使用DES加密一段文本,如果使用密码本模式(ECB),则将明文分割成连续8字节的数据段来加密。非常类似查密码本来查找密码。这种模式成为密码本模式。这种模式带来的问题也显而易见,同样一份明文经过同一个密钥加密出来的结果是一样的,这样我们可以替换一个片段来达到不可告人的目的。《计算机网络》中举的例子很有意思,如果某个雇员知道公司年终奖文件的格式,比如说每个雇员的记录为32字节长的记录,16字节名字,8字节职位,8字节奖金,那么这个雇员可以通过替换记录的低8字节来达到替换奖金的目的,而且很有可能不被检测出来!

2.密码块链模式(CBC)

为了对抗加密段的攻击,那么就需要将每段加密段联系起来,这就有了密码块链模式。这种模式需要一个初始向量IV(Initialization Vector)来执行异或操作。

其加密过程公式为$$C_i = E_k(P_i \oplus C_{i-1})$$
其中初始 $$C_0 = IV$$

以AES-128-CBC为例。对于每一个16字节明文,首先和16字节的向量执行异或操作,然后再传入加密模块加密,最终加密的结果继续用于下一个16字节加密前的异或。

其解密过程公式为$$P_i = D_k(C_i) \oplus C_{i-1}$$
其中初始 $$C_0 = IV$$

这样的加密方式,对于相同的明文块不会导致相同的密文块。这也是其安全的部分。
下面是我之前写的一段脚本,用到了就是OpenSSL的AES-256-CBC的算法

1
2
3
4
5
6
7
8
9
10
11
12
13
14
15
16
17
18
19
20
21
22
23
24
25
26
27
28
29
30
31
32
33
34
35
36
37
38
39
40
41
42
43
44
45
46
47
48
49
50
51
52
53
54
55
56
57
58
59
60
61
62
63
64
65
66
67
68
69
70
require 'openssl'
require 'digest/sha2'
require 'securerandom'

class OpenSLLAESDemo
ALG = 'AES-256-CBC'
def initialize

end

def self.encrypt (file, password=nil)

cipher = OpenSSL::Cipher.new(ALG)
cipher.encrypt
if password.nil?
key = cipher.random_key
else
key = Digest::SHA256.hexdigest(password)
end

iv = SecureRandom.hex(32)
cipher.key =key
cipher.iv = iv
File.new("#{file}.enc",File::CREAT)

File.open("#{file}.enc", 'wb') do |enc|
File.open(file, 'rb') do |f|
loop do
r = f.read(4096)
break unless r
temp = cipher.update(r)
enc << temp
end
end
temp = cipher.final
enc << temp
end
[key, iv]
end

def self.decrypt (key,iv,file)
cipher = OpenSSL::Cipher.new(ALG)
cipher.decrypt
cipher.key = key
cipher.iv = iv

File.new("#{file}.dec",File::CREAT)
File.open("#{file}.dec", 'wb') do |dec|
File.open("#{file}.enc", 'rb') do |enc|
loop do
r = enc.read(4096)
break unless r
temp = cipher.update(r)
dec << temp
end
end
temp = cipher.final
dec << temp
end
end
def self.hash(file)
Digest::SHA256.hexdigest(File.open(file, 'r'){|f| f.read})
end
end
file = 'this is my file path'
temp = OpenSLLAESDemo.encrypt(file, 'iampassword')
puts temp[0]
puts temp[1]
OpenSLLAESDemo.decrypt(temp[0], temp[1], file)
puts 'yes' if OpenSLLAESDemo.hash(file) ==OpenSLLAESDemo.hash("#{file}.dec")

3.密文反馈模式

CBC虽然说是最常用的模式,还以AES-128来说,它必须等待64字节的数据块到达后才能开始加密,这对于流式文件可以说是很不友好了。那么就有了密文反馈模式,这种模式可以改进这一点

先看它的公式吧

其加密公式为$$C_i = E_k(C_{i-1})\oplus P_i$$

解密为 $$P_i =E_k(C_{i-1})\oplus C_i$$

其中 $$C_0 = IV$$

CFM

看到这里需要注意解密过程,解密过程不是执行解密模块,而是一直加密。由于在解密过程中生成$$P_i$$的时候与$$C_i$$做异或的字节和生成$$P_i$$的时候与$$C_i$$做异或的是同一个字节,就可以保证解密的正确性。

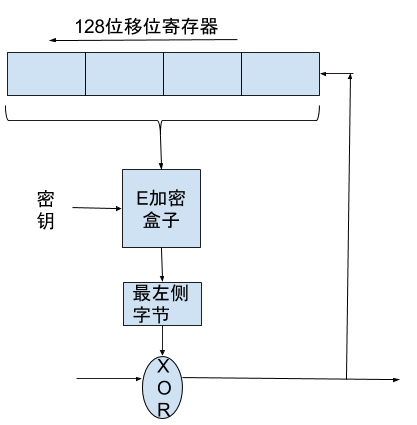
对比CBC模式,发现这样其实就不用$$E_k$$中就不用等待数据块的到来就可以执行。这还是最简单的,一般实现过程中,会使用移位寄存器,来保存多个加密过数据段。比如说下面这张图

因此其加密公式也就变为$$C_i = head(E_k(S_{i-1}),x)\oplus P_i$$

解密公式变为 $$P_i = head(E_K(S_{i-1}), x)\oplus C_i$$

其中$$S_0 = IV$$, $$S_i = ((S_{i-1}<<x) + C_i) mod 2^n$$

$$S_i$$的公式就是128位的移位寄存器移位结果了。果然看公式理解起来更快了。

用途

这些对称加密算法的使用场景一般是哪些呢?

我觉得只要适合文件加密或者信息加密的都适合。但由于是对称加密算法,所以加密解密需要同一个密钥,因此密钥管理是个大麻烦。这时候公钥加密RSA就派上用途了,但是RSA计算比较耗时,所以非对称加密和对称加密结合起来就是一个很完美的解决方案了。通过RSA传递AES的密钥,之后的对话就可以用AES来加密解密了。

下面展示一个简易版的HTTPS 通过SSL建立子协议的过程

SSL

之后的过程就可以使用对称加密来进行传输数据了。

最后

在做笔记看wiki的时候发现了个很有意思的词条,时序攻击。那再来说说时序攻击吧。

至于什么是时序攻击呢?举个匹配过程的例子吧

当验证密码的时候,需要将外界输入的密码和真实密码对比,如果我们在一遇到不同的字符就返回比对失败,那么对于不同的输入这个时间往往是不同的,根据返回结果的时间就可以大致猜测到哪一位是不同的。

例如下面的代码

1
2
3
for (int i=0; i<length; i++) {
if (unchecked[i] != password[i]) return i;
}

如果第一位就返回和最后一位返回,这个计算的时间肯定是不一样的。通过比对这个时间就可以判断失败位置。这样就将攻击难度降下去很多。

对于上面的例子,应对方案也很简单,如果发现字符匹配失败,不要急着返回结果,做个标记,全部匹配完毕再返回即可。

参考

  • 《计算机网络(第五版)》
  • https://zh.wikipedia.org/zh/%E9%AB%98%E7%BA%A7%E5%8A%A0%E5%AF%86%E6%A0%87%E5%87%86
  • https://zh.wikipedia.org/wiki/%E8%B3%87%E6%96%99%E5%8A%A0%E5%AF%86%E6%A8%99%E6%BA%96

从零开始写一个JSON解析器

发表于 2017-02-21 |

JSON的语法简单,很适合上完编译原理课程之后或者学习完龙书语法分析之后的练手。

**JSON**

JSON格式

1
2
3
4
{"a" : 123 }
[1,2,3]
{"a": [1,2,3] }
{"a" : {"b" : 123 }}

基础为以上几种。有了基本的格式,可以考虑先写词法分析部分。JSON格式类似于key/value存储,其中key为string类型,value复杂一些,可包括,string,int,double,jsonobject,jsonarray,true,false,null标记。所以对每个token都要逐一分析,构造出DFA。

  • 字符串
    字符串以 “ 开头,以 “ 结束。其中需要考虑的是转义字符的忽略以及unicode的格式(\u hex hex hex hex)

    1
    2
    3
    4
    5
    6
    7
    8
    9
    10
    11
    12
    13
    14
    15
    16
    17
    18
    19
    20
    21
    22
    23
    24
    25
    26
    27
    28
    29
    30
    31
    32
    33
    34
    35
    36
    37
    private Token readString() throws IOException, JsonLexException {
    StringBuilder builder = new StringBuilder();
    while ( (this.at_ = read()) != '\"') {
    if (this.at_ == '\r' || this.at_ == '\n') error("string", this.at_);
    if (this.at_ == '\\') {
    //check escape char
    this.at_ = read();
    if (isEscapeChar(this.at_)) {
    builder.append('\\');
    builder.append((char) this.at_);
    } else if (this.at_ == 'u'){
    //unicode
    builder.append('\\');
    builder.append('u');
    builder.append(unicode());

    } else {
    error("string", this.at_);
    }
    } else {
    builder.append((char) this.at_);
    }
    }
    if ( this.at_ != '\"') {
    //string is not closed
    error("string[not closed]", this.at_);
    }
    return this.token_ = new Token(JsonToken.STRING, new Value(builder.toString()));
    }

    private String unicode() throws IOException, JsonLexException {
    StringBuilder builder = new StringBuilder();
    int i=0;
    for (;i<4 && isHexChar(this.at_ = read()); builder.append((char) this.at_),++i);
    if (i < 4) error("unicode", this.at_);
    return builder.toString();
    }
  • 数字
    数字包含有符号int double以及科学计数法表示稍微麻烦,但是画出DFA分析就会明了很多。

DFA
据此就可很快写出来。

1
2
3
4
5
6
7
8
9
10
11
12
13
14
15
16
17
18
19
20
21
22
23
24
25
26
27
28
29
30
31
32
33
34
35
36
37
38
39
40
41
42
43
44
45
46
47
48
49
50
51
52
53
54
55
56
57
58
59
60
61
62
63
64
65
66
67
68
69
70
71
72
73
74
75
76
77
78
79
private Token readNumber(int at) throws IOException,JsonLexException {

StringBuilder builder = new StringBuilder();
int status = 0;
while (true) {
switch (status) {
case 0:
this.at_ = at;
if (this.at_ == '+' || this.at_ == '-') status = 1;
else if (Character.isDigit(this.at_)) status = 2;
else error("number", this.at_);
builder.append((char) this.at_);
break;
case 1:
this.at_ = read();
if (Character.isDigit(this.at_)) status = 2;
else error("number", this.at_);
builder.append((char) this.at_);
break;
case 2:
this.at_ = read();
if (this.at_ == '.') status = 3;
else if (Character.isDigit(this.at_)) status = 2;
else if (this.at_ == 'E' || this.at_ == 'e') status = 5;
else status = 8;
if (status != 8) {
builder.append((char) this.at_);
}
break;
case 3:
this.at_ = read();
if (Character.isDigit(this.at_)) status = 4;
else error("number", this.at_);
builder.append((char) this.at_);
break;
case 4:
this.at_ = read();
if (Character.isDigit(this.at_)) status = 4;
else if (this.at_ == 'E' || this.at_ == 'e') status = 5;
else status = 9;
if (status != 9) {
builder.append((char) this.at_);
}
break;
case 5:
this.at_ = read();
if (this.at_ == '+' || this.at_ == '-') status = 6;
else if (Character.isDigit(this.at_)) status = 7;
else error("number", this.at_);
builder.append((char) this.at_);
break;
case 6:
this.at_ = read();
if (Character.isDigit(this.at_)) status = 7;
else error("number", this.at_);
builder.append((char) this.at_);
break;
case 7:
this.at_ = read();
if (Character.isDigit(this.at_)) status = 7;
else status = 10;
if (status != 10) {
builder.append((char) this.at_);
}
break;
case 8: // int
unread(this.at_); // not a digit
return this.token_ = new Token(JsonToken.INT, new Value(Integer.valueOf(builder.toString())));
case 9: //double without 'E' or 'e'
unread(this.at_); // not a digit
return this.token_ = new Token(JsonToken.DOUBLE, new Value(Double.valueOf(builder.toString())));
case 10://double with 'E' or 'e'
unread(this.at_);// not a digit
return this.token_ = new Token(JsonToken.DOUBLE,new Value(Double.valueOf(builder.toString())));
default:
error("number", this.at_);
}
}
}
  • 其他字符
    对于其他终结符,true false null则只要匹配首字符来判断就可以了。

综上就可写出来lexer了

1
2
3
4
5
6
7
8
9
10
11
12
13
14
15
16
17
18
19
20
21
22
23
24
25
26
27
28
29
30
31
32
33
34
35
36
37
38
39
40
41
42
public Token scan() throws IOException, JsonLexException {
//this.at_ = '\0';
while (isWhiteBlack( this.at_ = read() ));
switch ((int)this.at_) {
case '{':
return this.token_ = new Token(JsonToken.BEGIN_OBJ, new Value("{"));
case '}':
return this.token_ = new Token(JsonToken.END_OBJ, new Value("}"));
case '[':
return this.token_ = new Token(JsonToken.BEGIN_ARR, new Value("["));
case ']':
return this.token_ = new Token(JsonToken.END_ARR, new Value("]"));
case ':':
return this.token_ = new Token(JsonToken.COLON, new Value(":"));
case ',':
return this.token_ = new Token(JsonToken.COMMA, new Value(","));
case '1': case '2': case '3': case '4': case '5':
case '6': case '7': case '8': case '9': case '0':
case '-': case '+': case '.':
return this.token_ = readNumber(this.at_);
case '\"':
return this.token_ = readString();
case 'n':
return this.token_ = readNull();
case 't':
return this.token_ = readTrue();
case 'f':
return this.token_ = readFalse();
case -1:
return this.token_ = new Token(JsonToken.EOF, new Value("eof"));
default:
this.token_ = null;
error("scan->default",this.at_);
return null;
}
}
```
词法分析就完成了。
## 语法分析
> 语法分析有LL, LR等方法这里采取LL(1)分析。

首先要构造出JSON文法。根据JSON基础格式。

obj -> { members }
members -> pair members’ | eps
members’ -> , pair members’ | eps
pair -> string : value
array -> [ elem ]
elem -> value elem’ | eps
elem’ -> , value elem’ | eps
value -> obj | array | number | string | true | false | null

1
2
3
4
5
6
7
8
9
10
11
12
13
14
15
16
17
18
19
20
21
22
23
24
25
26
27
28
29
30
31
32
33
34
35
36
37
38
39
40
41
42
43
44
45
46
47
48
49
50
51
52
53
54
55
56
57
58
59
60
61
62
63
64
65
66
67
68
69
70
71
72
73
74
75
76
77
78
79
80
81
82
83
84
85
86
87
88
89
90
91
92
93
94
95
96
97
98
99
100
101
102
103
104
105
106
107
108
109
110
111
112
113
114
115
116
117
118
119
120
121
122
123
124
125
求出FIRST集和FOLLOW集,验证可知为LL(1)文法。这样就可以用递归下降来做语法分析。
之后写出SDT就可以根据SDT来编写代码了。
```java

public Json parse() throws IOException, JsonParseException, JsonLexException {
Token token = lexer_.scan();
if (token.getToken() == JsonToken.BEGIN_OBJ) {
return object();
} else if (token.getToken() == JsonToken.BEGIN_ARR) {
return array();
} else {
error("parse", token.toString());
return null;
}
}

//文法 { member }
public JsonObject object() throws IOException,
JsonParseException, JsonLexException {
Map<String, Value> map = new HashMap<>();
return new JsonObject(member(map));
}

//对应文法 pair mem' | eps
public Map<String ,Value> member(Map<String, Value> map) throws IOException,
JsonLexException, JsonParseException {
Token token = lexer_.scan();
if (token.getToken() == JsonToken.END_OBJ) { //eps
return map;
}
return member_1( pair(map) );
}

//对应文法 , pair mem' | eps
public Map<String, Value> member_1(Map<String, Value> map) throws IOException, JsonLexException, JsonParseException {
Token token = lexer_.scan();
if (token.getToken() == JsonToken.COMMA) { //,
lexer_.scan();
return member_1( pair(map) );
} else if (token.getToken() == JsonToken.END_OBJ) { //eps
return map;
} else {
error("member_1", token.toString());
return null;
}
}

//文法 string : value
private Map<String, Value> pair(Map<String, Value> map) throws IOException, JsonLexException, JsonParseException {
Token token = lexer_.peek();
if (token.getToken() == JsonToken.STRING) {
String key = (String) token.getValue().get();
token = lexer_.scan();
if (token.getToken() == JsonToken.COLON) {
lexer_.scan();
map.put(key, value());
return map;
} else {
error("pair", token.toString());
return null;
}
} else {
error("pair", token.toString());
return null;
}
}

//文法 [ elem ]
public JsonArray array() throws IOException,JsonParseException, JsonLexException {
List<Value> list = new LinkedList<>();
return new JsonArray(elem(list));
}
//文法 value elem' | eps
public List<Value> elem(List<Value> list) throws IOException,
JsonLexException,JsonParseException {
Token token = lexer_.scan();
if (token.getToken() == JsonToken.END_ARR) { // eps
return list;
} else {
list.add(value());
return elem_1(list);
}
}

// 文法 , value elem' | eps
public List<Value> elem_1(List<Value> list) throws IOException,
JsonLexException, JsonParseException {
Token token = lexer_.scan();
if (token.getToken() == JsonToken.COMMA) { // ,
lexer_.scan();
list.add(value());
return elem_1(list);
} else if (token.getToken() == JsonToken.END_ARR) { // eps
return list;
} else {
error("elem_1",token.toString());
return null;
}
}

public Value value() throws IOException, JsonLexException,
JsonParseException {
Token token = lexer_.peek();
if (isCommonValue(token.getToken())) {
return new Value(token.getValue());
} else if (token.getToken() == JsonToken.BEGIN_OBJ) {
return new Value(object());
} else if (token.getToken() == JsonToken.BEGIN_ARR) {
return new Value(array());
} else {
error("value",token.toString());
return null;
}
}

private boolean isCommonValue(JsonToken token) {
return (token == JsonToken.STRING || token == JsonToken.FALSE ||
token == JsonToken.INT || token == JsonToken.DOUBLE ||
token == JsonToken.TRUE || token == JsonToken.NULL) ? true : false;
}


public void error(String position, String value) throws JsonParseException {
throw new JsonParseException(String.format("an error occurred on Parser [%s %s]",position,value));
}

至此一个简单的解析器已经写完了,只是实现了简单的解析功能,一个完善的JAVA JSON解析器至少可以对对象序列化和反序列化。后续将会添加上这部分功能,再更新一遍 :-|

源代码:ToyJSON

1…567

shiyan

31 日志
4 分类
14 标签
GitHub E-Mail
© 2017 — 2020 shiyan
由 Hexo 强力驱动
|
主题 — NexT.Mist v5.1.4