Focus on Java


  • 首页

  • 标签

  • 分类

  • 归档

Dubbo源码分析1 Dubbo SPI

发表于 2019-07-16 | 分类于 源码分析 |

计划阅读调试下Dubbo的源码,结合官方源码分析Dubbo,自身再分析总结

本文对应的Dubbo SPI

Dubbo SPI 使用

首先将配置文件放在META-INF/dubbo 目录下,与Java SPI不同的地方是,Dubbo SPI采用键值对方式,例如

1
2
optimusPrime = org.apache.spi.OptimusPrime
bumblebee = org.apache.spi.Bumblebee

与Java SPI另一个不同点,Dubbo SPI需要在接口加上SPI注解

例如官网的例子,

1
2
3
4
5
6
7
8
9
10
11
12
13
14
15
16
17
18
19
20
@SPI // 与Java SPI区别点
public interface Robot {
void sayHello();
}

public class OptimusPrime implements Robot {

@Override
public void sayHello() {
System.out.println("Hello, I am Optimus Prime.");
}
}

public class Bumblebee implements Robot {

@Override
public void sayHello() {
System.out.println("Hello, I am Bumblebee.");
}
}
1
2
3
4
5
6
7
8
9
10
11
12
13
public class DubboSPITest {

@Test
public void sayHello() throws Exception {
ExtensionLoader<Robot> extensionLoader =
ExtensionLoader.getExtensionLoader(Robot.class);
// 加载后,通过key-value方式获取实现类
Robot optimusPrime = extensionLoader.getExtension("optimusPrime");
optimusPrime.sayHello();
Robot bumblebee = extensionLoader.getExtension("bumblebee");
bumblebee.sayHello();
}
}

Dubbo SPI源码分析

获取ExtensionLoader

对照上面的例子,ExtensionLoader<Robot> extensionLoader = ExtensionLoader.getExtensionLoader(Robot.class);

1
2
3
4
5
6
7
8
9
10
11
12
13
14
15
16
17
18
19
@SuppressWarnings("unchecked")
public static <T> ExtensionLoader<T> getExtensionLoader(Class<T> type) {
if (type == null)
throw new IllegalArgumentException("Extension type == null");
if (!type.isInterface()) {
throw new IllegalArgumentException("Extension type(" + type + ") is not interface!");
}
if (!withExtensionAnnotation(type)) {
throw new IllegalArgumentException("Extension type(" + type +
") is not extension, because WITHOUT @" + SPI.class.getSimpleName() + " Annotation!");
}

ExtensionLoader<T> loader = (ExtensionLoader<T>) EXTENSION_LOADERS.get(type);
if (loader == null) {
EXTENSION_LOADERS.putIfAbsent(type, new ExtensionLoader<T>(type));
loader = (ExtensionLoader<T>) EXTENSION_LOADERS.get(type);
}
return loader;
}

上面的代码逻辑比较简单,就是去获取类对应的ExtensionLoader,如果缓存(EXTENSION_LOADERS是ConcurrentMap<Class, ExtensionLoader>)中存在,则直接获取,不存在就新建一个,并存入缓存

获取扩展类

获取到ExtensionLoader之后,下一步获取实现类

1
2
3
4
5
6
7
8
9
10
11
12
13
14
15
16
17
18
19
20
21
22
23
24
25
26
27
28
29
30
/**
* Find the extension with the given name. If the specified name is not found, then {@link IllegalStateException}
* will be thrown.
*/
@SuppressWarnings("unchecked")
public T getExtension(String name) {
if (name == null || name.length() == 0)
throw new IllegalArgumentException("Extension name == null");
if ("true".equals(name)) {
return getDefaultExtension();
}
Holder<Object> holder = cachedInstances.get(name);
if (holder == null) {
cachedInstances.putIfAbsent(name, new Holder<Object>());
holder = cachedInstances.get(name);
}
// 获取实现的引用
Object instance = holder.get();
if (instance == null) {
synchronized (holder) {
instance = holder.get();
if (instance == null) {
// 创建扩展实现
instance = createExtension(name);
holder.set(instance);
}
}
}
return (T) instance;
}

也是比较简单的逻辑,根绝name获取对应的实例,如果有直接返回,如果没有,就需要去新建

创建扩展类

1
2
3
4
5
6
7
8
9
10
11
12
13
14
15
16
17
18
19
20
21
22
23
24
25
26
27
28
29
30
31
@SuppressWarnings("unchecked")
private T createExtension(String name) {
// 从配置文件中读取类名,并加载类,初始化到名称-类的表中
Class<?> clazz = getExtensionClasses().get(name);
if (clazz == null) {
throw findException(name);
}
try {
T instance = (T) EXTENSION_INSTANCES.get(clazz);
if (instance == null) {
// 反射创建实例,存入缓存
EXTENSION_INSTANCES.putIfAbsent(clazz, (T) clazz.newInstance());
instance = (T) EXTENSION_INSTANCES.get(clazz);
}
// 注入依赖,Dubbo IOC部分,通过set方法注入需要的依赖
injectExtension(instance);
Set<Class<?>> wrapperClasses = cachedWrapperClasses;
if (wrapperClasses != null && wrapperClasses.size() > 0) {
// 循环创建 包装实例
for (Class<?> wrapperClass : wrapperClasses) {
// 用当前的实例作为参数传给后续的包装类作为入参
// 此处的做法涉及到WrapperClass部分
instance = injectExtension((T) wrapperClass.getConstructor(type).newInstance(instance));
}
}
return instance;
} catch (Throwable t) {
throw new IllegalStateException("Extension instance(name: " + name + ", class: " +
type + ") could not be instantiated: " + t.getMessage(), t);
}
}

创建的逻辑复杂一下,主要逻辑为,1、获取扩展类,2、反射创建扩展类,3、扩展类本身依赖注入,4、对于扩展类的包装对象循环创建

加载扩展类

createExtension 方法的中,第一个就是根据name获取Class。

1
2
3
4
5
6
7
8
9
10
11
12
13
14
15
16
17
18
19
20
21
22
23
24
25
26
27
28
29
30
31
32
33
34
35
36
37
38
39
40
41
   private Map<String, Class<?>> getExtensionClasses() {
Map<String, Class<?>> classes = cachedClasses.get();
if (classes == null) {
synchronized (cachedClasses) {
classes = cachedClasses.get();
if (classes == null) {
// 加载所有扩展类
classes = loadExtensionClasses();
cachedClasses.set(classes);
}
}
}
return classes;
}

// synchronized in getExtensionClasses
private Map<String, Class<?>> loadExtensionClasses() {
final SPI defaultAnnotation = type.getAnnotation(SPI.class);
// 对注解内容做校验
if (defaultAnnotation != null) {
String value = defaultAnnotation.value();
if ((value = value.trim()).length() > 0) {
String[] names = NAME_SEPARATOR.split(value);
if (names.length > 1) {
throw new IllegalStateException("more than 1 default extension name on extension " + type.getName()
+ ": " + Arrays.toString(names));
}
if (names.length == 1) cachedDefaultName = names[0];
}
}

Map<String, Class<?>> extensionClasses = new HashMap<String, Class<?>>();
// 从不同目录加载
// SERVICES_DIRECTORY = "META-INF/services/";
// DUBBO_DIRECTORY = "META-INF/dubbo/";
// DUBBO_INTERNAL_DIRECTORY = DUBBO_DIRECTORY + "internal/";
loadDirectory(extensionClasses, DUBBO_INTERNAL_DIRECTORY);
loadDirectory(extensionClasses, DUBBO_DIRECTORY);
loadDirectory(extensionClasses, SERVICES_DIRECTORY);
return extensionClasses;
}

目前为止,其过程比较简单,对SPI注解的值做校验,之后去不同目录加载所有的扩展类

1
2
3
4
5
6
7
8
9
10
11
12
13
14
15
16
17
18
19
20
21
22
23
24
25
26
27
28
29
30
31
32
33
34
35
36
37
38
39
40
41
42
43
44
45
46
47
48
49
50
51
52
53
54
55
56
57
58
59
60
61
62
 private void loadDirectory(Map<String, Class<?>> extensionClasses, String dir) {
// 根据类名,寻找文件
String fileName = dir + type.getName();
try {
Enumeration<java.net.URL> urls;
ClassLoader classLoader = findClassLoader();
if (classLoader != null) {
urls = classLoader.getResources(fileName);
} else {
urls = ClassLoader.getSystemResources(fileName);
}
if (urls != null) {
// 对此目录下所有的此名字文件处理
while (urls.hasMoreElements()) {
java.net.URL resourceURL = urls.nextElement();
// 加载此资源
loadResource(extensionClasses, classLoader, resourceURL);
}
}
} catch (Throwable t) {
logger.error("Exception when load extension class(interface: " +
type + ", description file: " + fileName + ").", t);
}
}


private void loadResource(Map<String, Class<?>> extensionClasses, ClassLoader classLoader, java.net.URL resourceURL) {
try {
BufferedReader reader = new BufferedReader(new InputStreamReader(resourceURL.openStream(), "utf-8"));
try {
String line;
while ((line = reader.readLine()) != null) {
// # 号为单行注释,忽略注释
final int ci = line.indexOf('#');
if (ci >= 0) line = line.substring(0, ci);
line = line.trim();
if (line.length() > 0) {
try {
String name = null;
int i = line.indexOf('=');
// 根据 = 分割,获取名称与类名
if (i > 0) {
name = line.substring(0, i).trim();
line = line.substring(i + 1).trim();
}
if (line.length() > 0) {
loadClass(extensionClasses, resourceURL, Class.forName(line, true, classLoader), name);
}
} catch (Throwable t) {
IllegalStateException e = new IllegalStateException("Failed to load extension class(interface: " + type + ", class line: " + line + ") in " + resourceURL + ", cause: " + t.getMessage(), t);
exceptions.put(line, e);
}
}
}
} finally {
reader.close();
}
} catch (Throwable t) {
logger.error("Exception when load extension class(interface: " +
type + ", class file: " + resourceURL + ") in " + resourceURL, t);
}
}

前面的操作主要为,对配置文件解析,获取的name以及类名,通过反射加载类,之后进行缓存操作

1
2
3
4
5
6
7
8
9
10
11
12
13
14
15
16
17
18
19
20
21
22
23
24
25
26
27
28
29
30
31
32
33
34
35
36
37
38
39
40
41
42
43
44
45
46
47
48
49
50
51
52
53
54
55
56
57
// 加载类之后,分为不同类型,对缓存的操作
private void loadClass(Map<String, Class<?>> extensionClasses, java.net.URL resourceURL, Class<?> clazz, String name) throws NoSuchMethodException {
if (!type.isAssignableFrom(clazz)) {
throw new IllegalStateException("Error when load extension class(interface: " +
type + ", class line: " + clazz.getName() + "), class "
+ clazz.getName() + "is not subtype of interface.");
}
if (clazz.isAnnotationPresent(Adaptive.class)) {
if (cachedAdaptiveClass == null) {
cachedAdaptiveClass = clazz;
} else if (!cachedAdaptiveClass.equals(clazz)) {
throw new IllegalStateException("More than 1 adaptive class found: "
+ cachedAdaptiveClass.getClass().getName()
+ ", " + clazz.getClass().getName());
}

} else if (isWrapperClass(clazz)) {
// 包装类处理
Set<Class<?>> wrappers = cachedWrapperClasses;
if (wrappers == null) {
cachedWrapperClasses = new ConcurrentHashSet<Class<?>>();
wrappers = cachedWrapperClasses;
}
wrappers.add(clazz);
} else {
// 普通类处理
clazz.getConstructor();
if (name == null || name.length() == 0) {
name = findAnnotationName(clazz);
if (name.length() == 0) {
throw new IllegalStateException("No such extension name for the class " + clazz.getName() + " in the config " + resourceURL);
}
}
// NAME_SEPARATOR = Pattern.compile("\\s*[,]+\\s*");
// 对名称分割
String[] names = NAME_SEPARATOR.split(name);
if (names != null && names.length > 0) {
Activate activate = clazz.getAnnotation(Activate.class);
if (activate != null) {
cachedActivates.put(names[0], activate);
}
for (String n : names) {
if (!cachedNames.containsKey(clazz)) {
cachedNames.put(clazz, n);
// class -> name 缓存
}
Class<?> c = extensionClasses.get(n);
if (c == null) {
extensionClasses.put(n, clazz);
// name -> class 缓存
} else if (c != clazz) {
throw new IllegalStateException("Duplicate extension " + type.getName() + " name " + n + " on " + c.getName() + " and " + clazz.getName());
}
}
}
}
}

至此,扩展类就已经加载完毕了。后续介绍Dubbo IOC部分

shell脚本的一些技巧

发表于 2019-07-08 |

获取输入参数个数

如果脚本需要入参,那么一开始一般会对参数做一个简单校验。$#即是入参个数

shell脚本获取目录下所有文件

1
2
3
4
for file in `ls | grep -E '*.jar|*.war'`
do
echo $file
done

ls之后使用通道和grep命令可以使用正则过滤出所需要文件

对文件名处理

假如一个文件名 test.jar 如何获取 test 以及 jar 这两部分?

1
2
3
4
5
file="test.jar"

prefix=${file%%.*}

suffix=${file#*.}

只需要以.为分隔符。prefix就是删掉最左边一个.右边所有的。

${file%%.*}中 %%意思是 从右边数,最后一个遇到.,然后删除所有.右边的

同样 # 表示从左边算起,但是一个#表示,从左边算起的第一个,并且删除左边的内容。也就得到了后缀

这样总结下来,# 从左边, %从右边,单个表示第一个,两个表示最后一个,中间为分隔符,*在那边,那边就删除

获取其他shell文件的退出值

有时,我们需要调用之前写好的shell文件,如何获取shell文件的exit值呢?

exit值会存储在#?中,我们直接执行shell文件之后,取这个值即可

1
2
3
4
5
./test.sh 1111

if [ #? -eq 0 ] ; then
## do you staff
fi

expect 命令 实现ssh登录

1
2
3
4
spawn ssh xx@xxxxxxxx
expect "password: "
send "your-password\r"
interact

expect 脚本获取 入参

1
2
3

set command [lindex $argv 0]
## set <param> [lindex $argv <param index>]

expect 根据输出值判断

1
2
3
4
5
6
7
8
9
10
11
expect {
"yes" {
set val 1
}

"no" {
set val 0
}


}

GenericObjectPool对象池实战

发表于 2019-07-06 |

通常一个对象创建/销毁的时候非常耗时,我们不会频繁的创建销毁它,而是考虑复用。复用对象的一种做法就是对象池,将创建好的对象放入池中维护起来,下次再用的时候直接拿池中已经创建好的对象继续用

GenericObjectPool

GenericObjectPool是一个通用对象池框架,我们可以借助它实现一个健壮的对象池

维护一个对象池需要实现以下基本的功能:

  • 创建对象

  • 借出对象

  • 验证对象

  • 归还对象

  • 销毁对象

GenericObjectPool 需要通过构造器注入一个PooledObjectFactory对象,而PooledObjectFactory中提供了维护对象池的方法

1
2
3
4
5
6
7
8
9
10
11
public interface PooledObjectFactory<T> {
PooledObject<T> makeObject() throws Exception;

void destroyObject(PooledObject<T> var1) throws Exception;

boolean validateObject(PooledObject<T> var1);

void activateObject(PooledObject<T> var1) throws Exception;

void passivateObject(PooledObject<T> var1) throws Exception;
}

以Socket连接池为例

1
2
3
4
5
6
7
8
9
10
11
12
13
14
15
16
17
18
19
20
21
22
23
24
25
26
27
28
29
30
31
32
33
34
35
36
37
38
39
40
41
42
43
44
45
46
47
48
49
50
51
52
53
54

public class ConnectionFactory extends BasePooledObjectFactory<Socket> {
// 创建socket对象
public Socket create() throws Exception {
String[] ipAndPort = host.split(":");
if (ipAndPort.length < 2) {
throw new ParseHostException();
}
Integer port = Integer.parseInt(ipAndPort[1]);
Socket socket = new Socket(ipAndPort[0], port);
socket.setSoTimeout(timeOut);
return socket;
}
// 包装为可维护的对象
public PooledObject<Socket> wrap(Socket socket) {
return new DefaultPooledObject<Socket>(socket);
}

/**
* 能关的都给他关了
* @param pooledObject
* @throws Exception
*/
public void destroyObject(PooledObject<Socket> pooledObject) throws Exception {
Socket socket = pooledObject.getObject();
if (socket != null) {
socket.getInputStream().close();
socket.getOutputStream().close();
socket.close();
}
}

// 验证对象,Pool对象可以设置借出归还时候是否需要验证对象
public boolean validateObject(PooledObject<Socket> pooledObject) {
Socket socket = pooledObject.getObject();
return socket != null && !socket.isClosed() && socket.isConnected();
}

/**
* 钝化归还对象,说白了就是对归还的对象清理
* 清空输入流,避免因为上一个请求字节未读取完导致inputStream非空,对下一个产生影响
* @param p
* @throws Exception
*/
@Override
public void passivateObject(PooledObject<Socket> p) throws Exception {
Socket socket = p.getObject();
InputStream inputStream = socket.getInputStream();
int available = inputStream.available();
if (available > 0) {
inputStream.skip(available);
}
}
}

有了上面的ConnectionFactory,就可以创建对象池了

1
2
3
4
5
6
7
8
9
10
11
12
13
14
15
16
17
18
19
20
21
22
23
24
25
26
27
28
29
30
31
32
33
34
35
36
37
38
39
40
41
42
43
44
45
public class ConnectionPoolExecutor implements Executor {

private GenericObjectPool<Socket> connectionPool = new GenericObjectPool<>(new ConnectionFactory());

private String host;
private int timeOut = 5000;
// 池的大小
private int poolSize = 5;
// 最少空闲对象个数
private int miniIdle = 0;
// 最大空闲对象个数
private int maxIdle = poolSize;
// 驱除策略,对象池内部维护了一个定时线程,如果配置了此属性,会定时调用此类来校验对象是否可用
private String evictionPolicyClassName;
// 驱除对象的定时线程执行间隔
private int timeBetweenEvictionRunsMillis=5000;
// 驱除对象的定时线程每次校验对象个数
private int numTestsPerEvictionRun = 1;


public ConnectionPoolExecutor() {
this.connectionPool.setTestOnBorrow(true);
this.connectionPool.setTestOnReturn(true);
this.connectionPool.setTestWhileIdle(true);
}

public void execute(Command command) throws ExecutionException {
try {
Socket socket = this.connectionPool.borrowObject();
InputStream inputStream = socket.getInputStream();
command.request(inputStream);
command.response(socket.getOutputStream());

this.connectionPool.returnObject(socket);
} catch (Exception e) {
throw new ExecutionException(e);
} finally {

}
}

public void dispose() {
this.connectionPool.close();
}
//....以下省略

上面的代码可以看到一个Executor接口,这是为了增强代码扩展性,抽象出来的接口

1
2
3
4
5
6
public interface Executor {

void execute(Command command) throws ExecutionException;

void dispose();
}
1
2
3
4
5
6
public interface Command {

void request(InputStream inputStream);

void response(OutputStream outputStream);
}

我们最终的目的是为了对外提供阻塞长连接服务,但socket对象池并非唯一实现方式。参考Command模式,我们只需要实现不同的executor就可以扩展不同的socket创建方式

1
2
3
4
5
6
7
8
9
10
11
12
13
14
15
16
17
18
19
20
21
22
23
24
25
26
27
28
29
30
31
32
33
34
35

/**
* 提供阻塞式socket服务
*/
public interface ServiceProvider {

void sendSimpleCommand();

}


public class ServiceProviderImpl implements ServiceProvider {

private Executor executor;

private void setExecutor(Executor executor) {
this.executor = executor;
}

public void sendSimpleCommand() {
try {
executor.execute(new Command() {
public void request(InputStream inputStream) {

}

public void response(OutputStream outputStream) {

}
});
} catch (ExecutionException e) {
e.printStackTrace();
}
}
}

改进版Snowflake全局ID生成器-uid-generator

发表于 2019-06-19 |

本文主要介绍 uid-generator (一种全局ID服务实现)

uid-generator介绍

全局ID服务是分布式服务中的基础服务,需要保持全局唯一,高效,高可靠性。有些时候还可能要求保持单调,但也并非一定要严格递增或者递减

全局ID也可以通过数据库的自增主键来获取,但是如果要求QPS很高显然是不现实的

uid-generator是对Snowflake算法的改进,也引入了高性能队列disruptor中RingBuffer思想,进一步提升了效率

1
2
3
4
+------+----------------------+----------------+-----------+
| sign | delta seconds | worker node id | sequence |
+------+----------------------+----------------+-----------+
1bit 28bits 22bits 13bits
  • sign 符号位 保证为正数

  • delta seconds 当前时间与约定时间的差值

  • word node id机器码

  • sequence 同一时刻支持并发数

上图就是snowflake算法生成的64位的长整型构成

uid-generator的work node id 使用了数据库自增主键的key,每次重启服务都需要刷新,这也保证了集群中全局ID的唯一性

worker node id字段处理

uid-generator使用数据库主键作为worker node id

这样看来这个worker node id其实可以有很丰富的扩展性,只要对表结构稍微修改,就可以记录使得worker node id 有更有意义的含义。

例如使用uid-generator生成的值作为表的主键ID,可以通过对WORKER_NODE表增加一列表名记录表,这样通过id就反向查找对应的表名

sequence字段的处理

uid-generator中实现了原生的snowflake以及缓存版的。这两个版本对于sequence字段的处理有所不同

DefaultUidGenerator.java

1
2
3
4
5
6
7
8
9
10
11
12
13
14
15
16
17
18
19
20
21
22
23
24
25
26
27
28
29
30
31
32
33
/**
* Get UID
*
* @return UID
* @throws UidGenerateException in the case: Clock moved backwards; Exceeds the max timestamp
*/
protected synchronized long nextId() {
long currentSecond = getCurrentSecond();

// Clock moved backwards, refuse to generate uid
if (currentSecond < lastSecond) {
long refusedSeconds = lastSecond - currentSecond;
throw new UidGenerateException("Clock moved backwards. Refusing for %d seconds", refusedSeconds);
}

// At the same second, increase sequence
if (currentSecond == lastSecond) {
sequence = (sequence + 1) & bitsAllocator.getMaxSequence();
// Exceed the max sequence, we wait the next second to generate uid
if (sequence == 0) {
currentSecond = getNextSecond(lastSecond);
}

// At the different second, sequence restart from zero
} else {
sequence = 0L;
}

lastSecond = currentSecond;

// Allocate bits for UID
return bitsAllocator.allocate(currentSecond - epochSeconds, workerId, sequence);
}

DefaultUidGenerator 并发通过 函数加锁控制;获取seq时通过时间判断是否需要调到下一秒

CachedUidGenerator.java

1
2
3
4
5
6
7
8
9
10
11
12
13
14
15
16
17
18
19
20
21
22
23
24
25
26
27
28
 /**
* Padding buffer fill the slots until to catch the cursor
*/
public void paddingBuffer() {
LOGGER.info("Ready to padding buffer lastSecond:{}. {}", lastSecond.get(), ringBuffer);

// is still running
if (!running.compareAndSet(false, true)) {
LOGGER.info("Padding buffer is still running. {}", ringBuffer);
return;
}

// fill the rest slots until to catch the cursor
boolean isFullRingBuffer = false;
while (!isFullRingBuffer) {
List<Long> uidList = uidProvider.provide(lastSecond.incrementAndGet());
for (Long uid : uidList) {
isFullRingBuffer = !ringBuffer.put(uid);
if (isFullRingBuffer) {
break;
}
}
}

// not running now
running.compareAndSet(true, false);
LOGGER.info("End to padding buffer lastSecond:{}. {}", lastSecond.get(), ringBuffer);
}

CachedUidGenerator 加锁通过CAS操作;由于需要一次填充完缓存,所以选取了一次填充一秒内所有的seq,以此保证了seq在一秒内的唯一性。这样带来的一个小弊端是不能通过id看出来这个id生成的时间

CachedUidGenerator核心RingBuffer实现

RingBuffer是一个环形数组,通过两个指针,tail、cursor来实现复用槽

在这里需要介绍一下FalseShare陷阱,由于tail和cursor指针在高并发情况下变动频繁,如果tail,cursor处于同一个缓存中,将会频繁导致缓存失效,可以看到uid-generator已经考虑了这个问题

通过对PaddedAtomicLong进行填充,保证了每一个long值都在不同的缓存行中,解决了这个问题

RingBuffer基本都用位运算取代了乘除以及取模计算,提高了计算效率

1
2
3
4
5
6
7
8
9
10
11
12
13
14
15
16
17
18
19
20
21
22
23
24
25
26
27
28
29
30
31
32
33
34
35
36
37
38
39
/**
* Put an UID in the ring & tail moved<br>
* We use 'synchronized' to guarantee the UID fill in slot & publish new tail sequence as atomic operations<br>
*
* <b>Note that: </b> It is recommended to put UID in a serialize way, cause we once batch generate a series UIDs and put
* the one by one into the buffer, so it is unnecessary put in multi-threads
*
* @param uid
* @return false means that the buffer is full, apply {@link RejectedPutBufferHandler}
*/
public synchronized boolean put(long uid) {
long currentTail = tail.get();
long currentCursor = cursor.get();

// tail catches the cursor, means that you can't put any cause of RingBuffer is full
long distance = currentTail - (currentCursor == START_POINT ? 0 : currentCursor);
if (distance == bufferSize - 1) {
rejectedPutHandler.rejectPutBuffer(this, uid);
return false;
}

// 1. pre-check whether the flag is CAN_PUT_FLAG
int nextTailIndex = calSlotIndex(currentTail + 1);
if (flags[nextTailIndex].get() != CAN_PUT_FLAG) {
rejectedPutHandler.rejectPutBuffer(this, uid);
return false;
}

// 2. put UID in the next slot
// 3. update next slot' flag to CAN_TAKE_FLAG
// 4. publish tail with sequence increase by one
slots[nextTailIndex] = uid;
flags[nextTailIndex].set(CAN_TAKE_FLAG);
tail.incrementAndGet();

// The atomicity of operations above, guarantees by 'synchronized'. In another word,
// the take operation can't consume the UID we just put, until the tail is published(tail.incrementAndGet())
return true;
}

在RingBuffer的put方法中可以看到整个的流程,首先是函数加锁,加锁的原因在注释部分也解释了,由于是每次批量存入的,多线程put操作是没有必要的,之后第一步计算tail与cursor距离当前数组是否还可以继续填充。这里还有另外一个标识位用来判断当前槽是否可以做PUT以及TAKE操作,更像是双保险,防止上一个判断距离结束了之后tail位置有变动,导致槽位被覆盖

同样对于take操作

1
2
3
4
5
6
7
8
9
10
11
12
13
14
15
16
17
18
19
20
21
22
23
24
25
26
27
28
29
30
31
32
33
34
35
36
37
38
39
40
41
42
43
44
/**
* Take an UID of the ring at the next cursor, this is a lock free operation by using atomic cursor<p>
*
* Before getting the UID, we also check whether reach the padding threshold,
* the padding buffer operation will be triggered in another thread<br>
* If there is no more available UID to be taken, the specified {@link RejectedTakeBufferHandler} will be applied<br>
*
* @return UID
* @throws IllegalStateException if the cursor moved back
*/
public long take() {
// spin get next available cursor
long currentCursor = cursor.get();
long nextCursor = cursor.updateAndGet(old -> old == tail.get() ? old : old + 1);

// check for safety consideration, it never occurs
Assert.isTrue(nextCursor >= currentCursor, "Curosr can't move back");

// trigger padding in an async-mode if reach the threshold
long currentTail = tail.get();
if (currentTail - nextCursor < paddingThreshold) {
LOGGER.info("Reach the padding threshold:{}. tail:{}, cursor:{}, rest:{}", paddingThreshold, currentTail,
nextCursor, currentTail - nextCursor);
bufferPaddingExecutor.asyncPadding();
}

// cursor catch the tail, means that there is no more available UID to take
if (nextCursor == currentCursor) {
rejectedTakeHandler.rejectTakeBuffer(this);
}

// 1. check next slot flag is CAN_TAKE_FLAG
int nextCursorIndex = calSlotIndex(nextCursor);
Assert.isTrue(flags[nextCursorIndex].get() == CAN_TAKE_FLAG, "Curosr not in can take status");

// 2. get UID from next slot
// 3. set next slot flag as CAN_PUT_FLAG.
long uid = slots[nextCursorIndex];
flags[nextCursorIndex].set(CAN_PUT_FLAG);

// Note that: Step 2,3 can not swap. If we set flag before get value of slot, the producer may overwrite the
// slot with a new UID, and this may cause the consumer take the UID twice after walk a round the ring
return uid;
}

正如注释中所说,take部分并没有并发限制,在剩余可用槽位小于一个阈值的时候,会触发一次填充操作

CachedUidGenerator 对于填充有两种处理,一个是低于阈值填充,一种是开启Schedule,定时填充,定时填充可选

uid-generator可靠性很高,除了workid依赖数据库之外基本不依赖外部中间件,全局ID在分布式服务中扮演关键角色,一旦服务出错,解决起来也很棘手。

译-Java字节码:学会字节码,更上一层楼

发表于 2018-11-08 |

下文中有关字节码的内容和字节码本身,是基于Java 2 SDK标准版 v1.2.1 javac compiler. 不同的编译器生成的字节码或略有不同

为何要了解字节码?

字节码作为 Java 程序的中间语言 正如汇编是 C/C++程序的中间语言。顶级的C/C++程序员是知道他们的程序编译出来的汇编指令集的。在做性能和内存调优的时候,这种技能至关重要的。了解你的代码编译出来的汇编指令,会对你实现性能和内存目标时有所启发。此外,当在追踪一个问题时,用调试器反汇编源码,一步一步执行汇编代码,通常很有用

Java 经常被忽视的部分就是 字节码,对于Java程序员,理解 字节码 和Java编译器可能生成的字节码 就像 C/C++程序员理解汇编一样有益

字节码就是你的程序。不管JIT 或者hotspot runtime (即时编译器),字节码在你的代码的执行速度和大小上占着重要的一部分。考虑一下,你生成越多的字节码,那么class文件就越大,JIT或者hotpot runtime就要编译更多的字节。下面就带你深入了解下Java字节码。

生成字节码

1
2
javac Employee.java
javap -c Employee > Employee.bc
1
2
3
4
5
6
7
8
9
10
11
12
13
14
15
16
17
18
19
20
21
22
23
24
25
26
27
28
29
30
31
32
33
34
Compiled from Employee.java
class Employee extends java.lang.Object {
public Employee(java.lang.String,int);
public java.lang.String employeeName();
public int employeeNumber();
}

Method Employee(java.lang.String,int)
0 aload_0
1 invokespecial #3 <Method java.lang.Object()>
4 aload_0
5 aload_1
6 putfield #5 <Field java.lang.String name>
9 aload_0
10 iload_2
11 putfield #4 <Field int idNumber>
14 aload_0
15 aload_1
16 iload_2
17 invokespecial #6 <Method void storeData(java.lang.String, int)>
20 return

Method java.lang.String employeeName()
0 aload_0
1 getfield #5 <Field java.lang.String name>
4 areturn

Method int employeeNumber()
0 aload_0
1 getfield #4 <Field int idNumber>
4 ireturn

Method void storeData(java.lang.String, int)
0 return

这个类十分简单,包含了两个成员变量,一个构造函数,和三个方法。字节码文件前五行列出了源代码文件名,类的定义以及它的基类(默认所有类继承与java.lang.Object),和构造函数和类方法,再之后列出了每一个构造函数的字节码,再后面是按照字母序列出来的类方法的字节码

你可能已经注意到某些操作码是以i或者a开头的。例如,在Employee类构造器,你能看到 aload_0 和 iload_2 。这些前缀表示了操作码使用的类型。前缀 a 意味着 这个操作码 正在操作一个对象的引用。前缀 i 意味着这个操作码正在操作一个整数。其他操作码用 b 表示byte, c 表示char,d表示double,等等等等。操作码的前缀让你一眼看出来正在被操作的数据类型

注意:单个的代码通常被成为操作码,多个操作码通常被称作字节码

细节

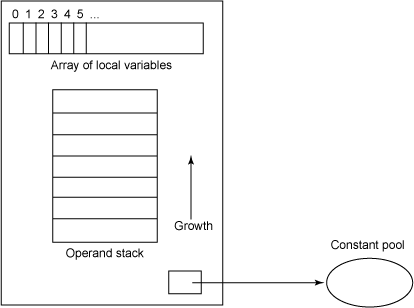
为了理解字节码的细节,我们需要讨论下Java虚拟机(JVM)是如何处理字节码的执行。JVM是基于堆栈的。每个线程都有一个JVM存储栈帧的栈,每当一个方法被调用,一个栈帧就会被创建出来,一个栈帧包括了一个操作数栈,一个局部变量表,以及这个类的当前方法的运行时常量池的引用。从概念上来说,它类似于:

A frame

本地变量的列表,也被称为本地变量表,包含有这个方法的入参以及被用来保留本地变量的值。列表开始与0,最开始存储的是方法的入参。如果这是一个构造函数或者一个成员函数,存储在0位的是实例的引用(this),之后第一位保存着第一个正式的参数,第二位保留着第二个正式的参数,以此类推。对一个静态方法,0位存储的是第一个正式的入参,1位存储的第二个正式的入参,以此类推。

本地变量表的大小在编译时间就已经确定了,取决于本地变量的数量和方法的参数。操作数栈是一个用来PUSH/POP值的后进先出(LIFO)的堆栈。它的大小也依然是在编译的时候就确定了。某些操作码PUSH值到操作数栈;其余的从操作数栈中获取操作码,操作他们,并且PUSH进入结果。操作数栈同样用来接收方法的返回值

1
2
3
4
5
6
7
8
9
public String employeeName()
{
return name;
}

Method java.lang.String employeeName()
0 aload_0
1 getfield #5 <Field java.lang.String name>
4 areturn

这个方法的字节码包含了三个操作码。第一个是aload_0,它对应的操作是:把本地变量表的首位压入到操作数栈中。前面提到本地变量表是用来传递方法的参数。对于构造函数和成员函数,this引用总是存储在本地变量表的首位(下标为0)。this变量必须被压入栈中,因为这个方法正在访问这个类的数据,名称。

下一次操作码,getfield 用于获取类的实例域。当操作码被执行后,栈顶数据(this)会被取出来。那么,#5 用来构建这个运行时实例池中对应name的引用的序号。当这个引用被获取后,压入操作数栈中。

最后一个操作码,areturn,返回方法的引用。更详细点,areturn的执行会导致操作数堆栈的顶部数据,即name的引用被弹出,并压入调用方法的操作数堆栈。

employeeName的方法非常简单。在我们看更复杂的例子之前,我们需要检查下每个操作码左边的数值。在employeeName 方法的字节码中,这些值是0,1,4。每一个方法都有一个对应的操作码数组。这些值相当于这些存储操作码和它的参数的数组的下标。你可能会好奇为什么这些数据不是连续的。既然每个字节码每个指令占用一个字节,那么为什么序号不是0,1,2?原因是一些操作码是带有参数的,这些参数会占用一定的字节码的数组。例如 aload_0 指令没有参数,自然就只占用一个字节。因此,下一个操作码,getfield,在位置1。但是areturn是在位置4。这是因为getfield操作码和他的参数占了位置1,2,3。位置1用于getfield的操作码,位置2和位置3用来存储它的参数。这些参数用来构造在这个类中这个值在运行是常量池中存储的位置。下面的表中展示了employeeName 字节码数组 的样子:

Bytecode array for employeeName method

事实上,字节码数组包含的代表指令的字节。查看用十六进制的编辑器查看.class文件,你会在字节码数组中看到下面的值:

Values in the bytecode array

2A,B4,和B0 分别相当于 aload_0, getfield, areturn

1
2
3
4
5
6
7
8
9
10
11
12
13
14
15
16
17
18
19
20
21
public Employee(String strName, int num)
{
name = strName;
idNumber = num;
storeData(strName, num);
}

Method Employee(java.lang.String,int)
0 aload_0
1 invokespecial #3 <Method java.lang.Object()>
4 aload_0
5 aload_1
6 putfield #5 <Field java.lang.String name>
9 aload_0
10 iload_2
11 putfield #4 <Field int idNumber>
14 aload_0
15 aload_1
16 iload_2
17 invokespecial #6 <Method void storeData(java.lang.String, int)>
20 return

第一个在位置0的操作码指令,aload_0 将this引用压入操作码栈。(记住,实例方法和构造函数的本地变量表中第一个条目是this引用)

下一个在位置1的操作码指令,invokespecial,调用了基类的构造函数。因为所有没有明确指定继承任意其他的类都隐式地继承java.lang.Object类,编译器提供了必要的字节码去调用基类的构造函数。在这个操作码执行过程中,操作数栈的栈顶数据,this,被弹出。

下面再位置4,5的两个操作码,压入本地变量表中最开始的两个条目到操作数堆栈中。第一个被压入的值是this,第二个是第构造函数一个正式的参数,strName。这些压入的值都是为了在位置6的putfield操作码做准备。

putfield 操作码 抛出栈顶的2个值,并且将strName的引用存储到被this引用的实例数据名。

下面三个在位置9,10,11的操作码指令,用构造函数第二个正式的参数num,和实例的变量,idNumber,执行着相同的操作。

下面三个在位置14,15,16的操作码指令,是在为调用storeDate方法准备数据。这些指令分别压入this引用,strName和num。this引入一定要被压入栈中,因为一个实例方法被调用。如果一个方式是静态的,那么this引用则不需要被压入。strName和num被压入是因为他们是storeData方法的参数。当storeData方法执行时,this,strName,num会分别占据那个方法的栈帧中的本地变量表中的序号为0,1,2的位置。

大小和速度问题

性能对于许多使用Java的桌面和服务器系统是一个关键问题。随着Java从这些系统转移到更小的嵌入式设备,大小问题也变得重要了。了解Java生成的字节码可以帮助你写出更精简,更有效的代码。举例来说,Java中的同步。下面的两个方法返回一个数组中第一位元素。两种方法使用同步方式,并且是功能等同的。

1
2
3
4
5
6
7
8
9
10
public synchronized int top1()
{
return intArr[0];
}
public int top2()
{
synchronized (this) {
return intArr[0];
}
}

尽管这些方法使用的同步是不同的,但是是功能等同的。但是,不宜察觉出来,两段代码在性能和大小上是不同的。在这个例子中,top1大概比top2快13个点,并且更小。检查下生成的字节码就明白这些方法有何不同了。字节码上加的注释是为了帮助更好的理解操作码做了什么。

1
2
3
4
5
6
7
8
9
10
11
12
13
14
15
16
17
18
19
20
21
22
23
24
25
26
27
28
29
30
31
32
33
34
35
36
37
38
39
40
41
42
43
44
45
46
47
48
49
50
51
52
53
54
55
56
57
Method int top1()
0 aload_0 //Push the object reference(this) at index 将this压入本地变量表首位
//0 of the local variable table.
1 getfield #6 <Field int intArr[]>
//Pop the object reference(this) and push 弹出this,从常量池中压入intArr对象引用
//the object reference for intArr accessed
//from the constant pool.
4 iconst_0 //Push 0. 压入0
5 iaload //Pop the top two values and push the 弹出最顶部两个数据,压入intArr[0]
//value at index 0 of intArr.
6 ireturn //Pop top value and push it on the operand 弹出顶部值,压入调用方法操作数堆栈中,退出
//stack of the invoking method. Exit.

Method int top2()
0 aload_0 //Push the object reference(this) at index 将this压入本地变量表首位
//0 of the local variable table.
1 astore_2 //Pop the object reference(this) and store 弹出this,存储到本地变量表下标为2的位置
//at index 2 of the local variable table.
2 aload_2 //Push the object reference(this). 压入this
3 monitorenter //Pop the object reference(this) and 弹出this,并获取对象monitor
//acquire the object's monitor.
4 aload_0 //Beginning of the synchronized block. 开始同步块。压入this到本地变量表首位
//Push the object reference(this) at index
//0 of the local variable table.
5 getfield #6 <Field int intArr[]>
//Pop the object reference(this) and push 弹出this,压入intArr的引用
//the object reference for intArr accessed
//from the constant pool.
8 iconst_0 //Push 0. 压入0
9 iaload //Pop the top two values and push the 弹出最顶部两个数据,压入intArr[0]
//value at index 0 of intArr.
10 istore_1 //Pop the value and store it at index 1 of 弹出这个值并存储在本地变量表下标为1的位置
//the local variable table.
11 jsr 19 //Push the address of the next opcode(14) 压入下一个操作码地址,跳到位置19
//and jump to location 19.
14 iload_1 //Push the value at index 1 of the local 压入本地变更量表中下标为1的值
//variable table.
15 ireturn //Pop top value and push it on the operand 弹出顶部的值,并压入调用方法的操作数堆栈,退出
//stack of the invoking method. Exit.
16 aload_2 //End of the synchronized block. Push the 同步块结束。压入this到本地变量表下标为2的位置
//object reference(this) at index 2 of the
//local variable table.
17 monitorexit //Pop the object reference(this) and exit 弹出this,并退出monitor
//the monitor.
18 athrow //Pop the object reference(this) and throw 弹出this,并抛出一个异常
//an exception.
19 astore_3 //Pop the return address(14) and store it 弹出返回地址(14)并存储在本地变量表下标为3的位置
//at index 3 of the local variable table.
20 aload_2 //Push the object reference(this) at 压入this
//index 2 of the local variable table.
21 monitorexit //Pop the object reference(this) and exit 弹出this,推出monitor
//the monitor.
22 ret 3 //Return to the location indicated by 返回本地变量表中下标为3的值对应的地址(14)
//index 3 of the local variable table(14).
Exception table: //If any exception occurs between 如果在位置4(含位置4)和位置16(不含位置16)中出现异常
from to target type //location 4 (inclusive) and location 跳到位置16
4 16 16 any //16 (exclusive) jump to location 16.

top2方法更大更慢,原因在于同步以及异常处理。注意到top1方法使用的是synchronized方法修饰符,这样没有生成多余的字节码。相比之下,top2使用了在方法中使用了synchronized同步块。

在方法中使用synchronized同步块会生成monitorenter和monitorexit的操作码,以及生成附加的代码去处理异常。如果在执行同步块中的代码时抛出了异常,锁需要保证在退出同步块的之前被释放。top1的实现略微比top2高效;这可以产生非常小的性能增益。

当存在synchronized方法修饰符时,就像top1,获取锁和后续释放锁就不同是通过monitorenter和monitorexit来完成的了。不同的是,当JVM调用一个方法,它会检查ACC_SYNCHRONIZED属性标记。如果存在这个表标记,执行的线程会获取锁,调用方法,之后当方法返回时释放锁。如果在这个同步的方法中有异常抛出,锁会在异常离开方法时候自动释放。

注意:如果synchronized方法修饰符存在,ACC_SYNCHROINZED属性标记包含在方法的method_info结构中。

无论使用synchronized方法修饰符还是synchronized方法块,在大小上都会有影响。仅仅当你的代码要求同步,并且你了解因此带来的消耗的时候,使用同步方法。如果整个方法都需要同步,为了产生更小的和稍微快点的方法,相比同步块,我推荐方法修饰符。

1…345…7

shiyan

31 日志
4 分类
14 标签
GitHub E-Mail
© 2017 — 2020 shiyan
由 Hexo 强力驱动
|
主题 — NexT.Mist v5.1.4